


“I love America.” It’s all I said when asked one year ago (as of tomorrow) why I was festooned with so many American-flag inspired accouterments (I’m talking American flag shorts, an American flag shirt, red converse sneakers, red Ray Bans, and, as the magnum opus , a custom nail paint job resembling our stars and stripes). It’s definitely a look, and while it may not be for everyone, if you're interested in flaunting your pride for this great country of ours (and you want to look effing awesome come July 4th), I suggest you follow suit. Your nail art mission, should you choose to accept it, is outlined below:
-
Prep your nails! Buff, file, moisturize, etc. You know why.
-
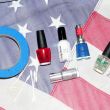
Base coat! Why? This step is an important measure for protecting your nails from the polish and maintaining your manicure. I prefer to use a strengthening base coat, like OPI’s Nail Envy.
-
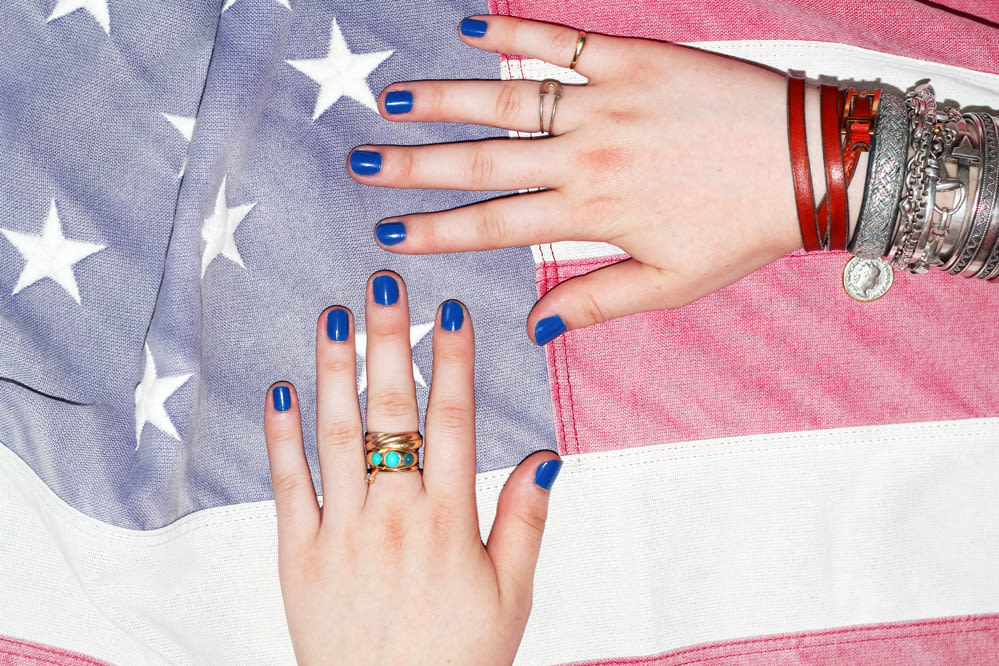
Polish 1: blue! Apply a layer or two of a cobalt hue, like Revlon’s Top Speed in 312 Superstitious, over your entire nail to maintain a level surface.
-
Dry! During this downtime, re-familiarize yourself Jack Nicholson’s “You can’t handle the truth!” scene from A Few Good Men to get into a truly patriotic mindset.
-
Tape! Make sure your polish is totally dry, then tape over the bottom-third of the nail to cover the section you’d like to keep blue. A sweet tip we learned from Shara (who commented on our Sol Lewitt Nails story) is to quickly stick the tape to your clothes before applying it to your nails, thus minimizing the chances of pulling off and/or disturbing your base color. Note: Be sure to press the tape down at the corners of your nail completely, so that red polish won’t bleed underneath any crevices you might have missed!
-
Polish 2: red! Paint the top two-thirds of your nails with a cherry tone, like OPI’s The Thrill of Brazil. And, since you’ll be adding even more polish on top of this (the white stripes), try to make your coats as thin as possible while applying enough to cover the blue.
-
Dry, part two! Let your nails dry again before removing the tape and adding the white. Take a second to watch the beginning of the great Disney Channel Original Movie, My Date With The President’s Daughter, to be reminded that not all American cinematic masterpieces have to be dark and gritty and can, instead, be an apt portrayal of what Sasha and Malia likely experience on a daily basis.
-
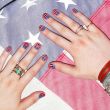
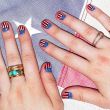
Polish 3: white OR silver! It is now time to complete the American color trifecta with Sally Hansen's Hard as Nails in White On and/or Clinique’s Strappy Sandals. This is where a steady hand comes into play. If you’re a wizard with a striper, props to you and take it away, but for the rest of us, a toothpick dipped in polish should do the trick. Beginning at the intersection of your red and blue polishes, draw a light amount of white or silver polish toward the tip of your nail in a thin, horizontal line. Repeat. How thick and how many stripes you add depends on your aesthetics and the width of your nail (historical accuracy isn’t necessary here—13 stripes on one fingernail would require the coordination of a ninja), but, typically, about four stripes looks best. With the same toothpick and polish, add a bunch of white or silver dots on the base of your nails, to act as stars. If you can draw a tiny little five-pointed star, good on you, but spots work just as well and are much easier to accomplish. Tip: the metallic polish can be used in place of, or in concert with, the white polish. I used silver on just one finger—my left ring.
-
Top coat! After a minute of drying, seal the deal on your patriotic nails with a top coat, like Deborah Lippmann's On A Clear Day.
-
Be the coolest person at whatever party you’re going to! Now that you’re parading awe-inspiring fingernails, not much else is required. You’re welcome. I’m not saying you’ll look as iconic as Kirsten Dunst and Michelle Williams did at the end of Dick, but it’s pretty darn close.
Happy Independence Day from all of us at the Gloffice, enjoy your day(s) off.
—Elizabeth Brockway
Photos by Zoe Ruffner