


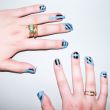
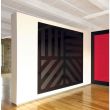

A few days ago, while I was walking through Ricky’s in Soho (for those of you not NYC based, Ricky’s is a fantastical, cracked-out version of your typical drugstore filled with your typical less expensive brands, “indie” brands, French favorites, and everything you would need for a Halloween costume), I came across Essie’s Matte About You—a topcoat with a—wait for it—matte finish. Ah ha! A polish I do not own! Of course, I purchased, went home, and tried it out, and have used it non-stop for the past two weeks. My favorite application? An ode to Sol Lewitt... (Let me make a quick note here: while I love polish, and I love doing crazy things to my nails, rarely do I go searching for inspiration images on which to base my D.I.Y. nail art.) As soon as I watched Matte About You change from a glossy shine to a light-absorbing black, all I could think of was Lewitt’s Wall Drawing 821 at MASS MoCA. Having been an art-history major/nerd in school, I was pretty excited to apply some of the Minimalist’s ideas to my fingers. The process was not as tough as expected. However, a disclaimer: it is a bit time consuming, and requires patience. Here are my steps to achieving Sol Lewitt nails:
Beautify your fingers! Whether you’re a pro with a cuticle scissor or not, a little buffing and filing is always necessary for a professional-looking manicure. Try using an orange stick to push back the cuticle base and clean away any dirt from underneath the nail. And be sure to moisturize your hands. I’m a fan of Lubriderm Daily Moisture Lotion, but any type will do. Just be sure to wipe any cream off the nail before applying polish.
Base coat! Always apply a base coat—very important. It helps protect your nail and keeps the polish in place a bit longer. I used Jin Soon’s Power Coat because it does just that. My nails are naturally pretty weak and any assistance I can get in that department is gladly accepted.
Nail polish! Time to apply the polish. Stick to just two coats if possible, particularly if the polish is thick. If you're working with a thin product, three coats should be fine—you want to make sure you have complete coverage with no semi-sheer areas poking through. I chose the black from Nars' new Pierre Hardy collection because it is very high-gloss (a perfect contrast to the matte areas to come). Essie’s Licorice and Sally Hansen’s Pat on the Black are good alternatives.
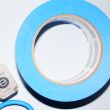
Dry! This is where patience comes into play. In order to achieve the straight lines necessary for the final look, you will need to apply tape to your already painted nails. As anyone who's ever tried to remove tape from paper, or painter's tape from a freshly painted wall, can attest, tape has a nasty habit of sticking to whatever it's applied to. This is especially true in the case of wet nail polish. Make sure your nails are dry (not just “ready to leave the salon” dry). Take this time to clean up the edges using a polish-dipped cotton swab (or make your own Q-Tip with your orange stick and a piece of a cotton ball).
Tape! I figured, since I was doing a bit of painting myself, what better product to use than real painter’s tape. Cut out several tiny strips of tape and stick to the side of a table for easy access/removal. I went for strips about 1/5 cm in width, but cater the width of the tape to that of your nail. Here’s your chance to be creative. The design is up to you; I stayed fairly true to the Lewitt painting, itself (doing horizontals, verticals, and diagonals leaning left and right), but go crazy! It’s your nail, your party—you do you.
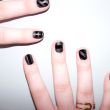
Matte that shiz up! Once you apply the tape and press down the sides (make sure the tape is flush with the nail, and not poking up anywhere), apply the matte topcoat. It dries in zero seconds, so it’s easy to see if you’ve missed a spot. If a second coat is necessary, go for it, if not, wait a minute and…
Remove the tape! Be careful while doing this because, as previously mentioned, tape tends to pick up paint. If you’re noticing some peeling here and there, try pulling the tape up from the other direction. If you waited long enough during the “dry” stage, you should be ok.
Buff! You will likely have unevenly painted nails at this point, which leave the more OCD among us a bit uneasy. Again, making sure your nails are dry, try buffing them a bit to even out the edges. If you have a block with a very very soft surface, use that; if not, your jeans will work just fine. Rub your nails against the fabric a few times and the matte vs. shine levels should even out.
And there you have it! Matte obviously lends itself to more than just contemporary art designs, so go ahead and experiment.
—Elizabeth Brockway
Photos by Brennan Kilbane.